 |
Digital Photo Blending
"Starting with the
Camera then to the Software"
Tips
& Tricks to Achieve Professional Results
by Ricardo
Da Cunha
Digital photo
blending, or exposure blending as it is also known, is a very effective
way of combining two or more photos of the same scene for special
effect - movement and sharpness for example.
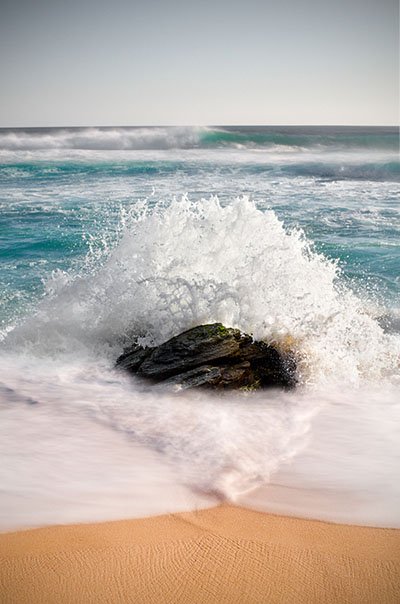
This image was shot at a secluded surf break known as Honeycombs in
Western Australia’s South West near the famous Margaret River region.
The image you see below is composed of two blended exposures; one
slower one to convey motion and the other taken using a fast shutter
speed to freeze the wave hitting the rock. Here’s how the image was put
together:
Behind the camera:digital
photo blending
1. After
pre-visualising the shoot that I was after and finding the right
composition, I started off by taking my base exposure which would be
the prolonged one.
2. To achieve a
prolonged exposure during the mid afternoon when there was so much
light around I used a 10 stop Neutral Density (ND) filter which is
almost black! ND filters work like sunglasses to reduce the amount of
light
3. After
capturing a number of separate exposures to try and capture the optimum
water movement (I found about 1-2 seconds produced good results), I
removed the ND filter and put the camera into burst mode which then
allowed me to take successive shots instantaneously. Doing this allowed
me to select from a number of exposures that best represented the wave
crashing against the rock and how I had pre-visualised it.
4. Unfortunately
though I found that the exposure was not quick enough to freeze the
movement of the wave so to achieve a quicker shutter speed (i.e. 1/1000
second) I increased the ISO from 100 to approximately 800 which
resulted in achieving a shutter speed that was 3 times quicker than my
previous shutter speed at an ISO of 100. Still shooting in burst mode,
I fired off a number of exposures until I got the shot of the frozen
wave hitting the rock I was after.
5. It’s
important to modify only the ISO when wanting to achieve quicker
shutter speeds instead of changing the Aperture as an alternative.
Changing the Aperture to compensate would have altered the depth of
field which would have subsequently caused issues later when blending
the exposures together.
At the computer:digital
photo blending
1. With the best
exposures selected; one to represent slow motion and the other to
freeze, I then opened up each image in Photoshop and dragged and
dropped the faster shutter speed image on top of the other. Holding
down the Shift key here will ensure that both images are perfectly
aligned.
2. Next I then
added a layer mask to the top image and changed the mask to black to
hide it and reveal the layer/image below it.
3. Finally it
was then just a case of using my brush tool with my foreground colour
set to white and brush in the frozen wave action to reveal it over the
top of my base image containing the longer exposure. A good tip here is
to use a feathered brush and lower the opacity of the brush in order to
disguise the blending of the two images.
And that’s it!
digital
photo blending
|
|

All of the advice, tutorials, masterclasses and ideas on this website are available to you at no charge. Even so, its upkeep does incur costs.
|
|
|
If you feel that
the site has helped you then any contribution you make, however small,
would go towards its ongoing maintenance and development.
Thanks for your help. |
|


New! Comments
Have your say about what you just read! Leave me a comment in the box below.